Project Setup
Retrieve Setup Parameters
Download the setup information from the link below.
Quick Start Exercise - Setup Parameters
When you have finished the configuration of a workstep, press the play button to proceed to the next step listed in the headings below. Remember that not all workflow steps are mandatory.
Setup Settings
In the Setup Settings workstep, click on the Design category and ensure that the Lane Generation Mode is set to:
Simulate with lines and intersection turns created tfrom the designed centre lines.
Periods
Add 2 periods sets:
- Days
- Shifts
Once the sets are created, set Days to be the primary set configure each period set as per below.
Day Configuration
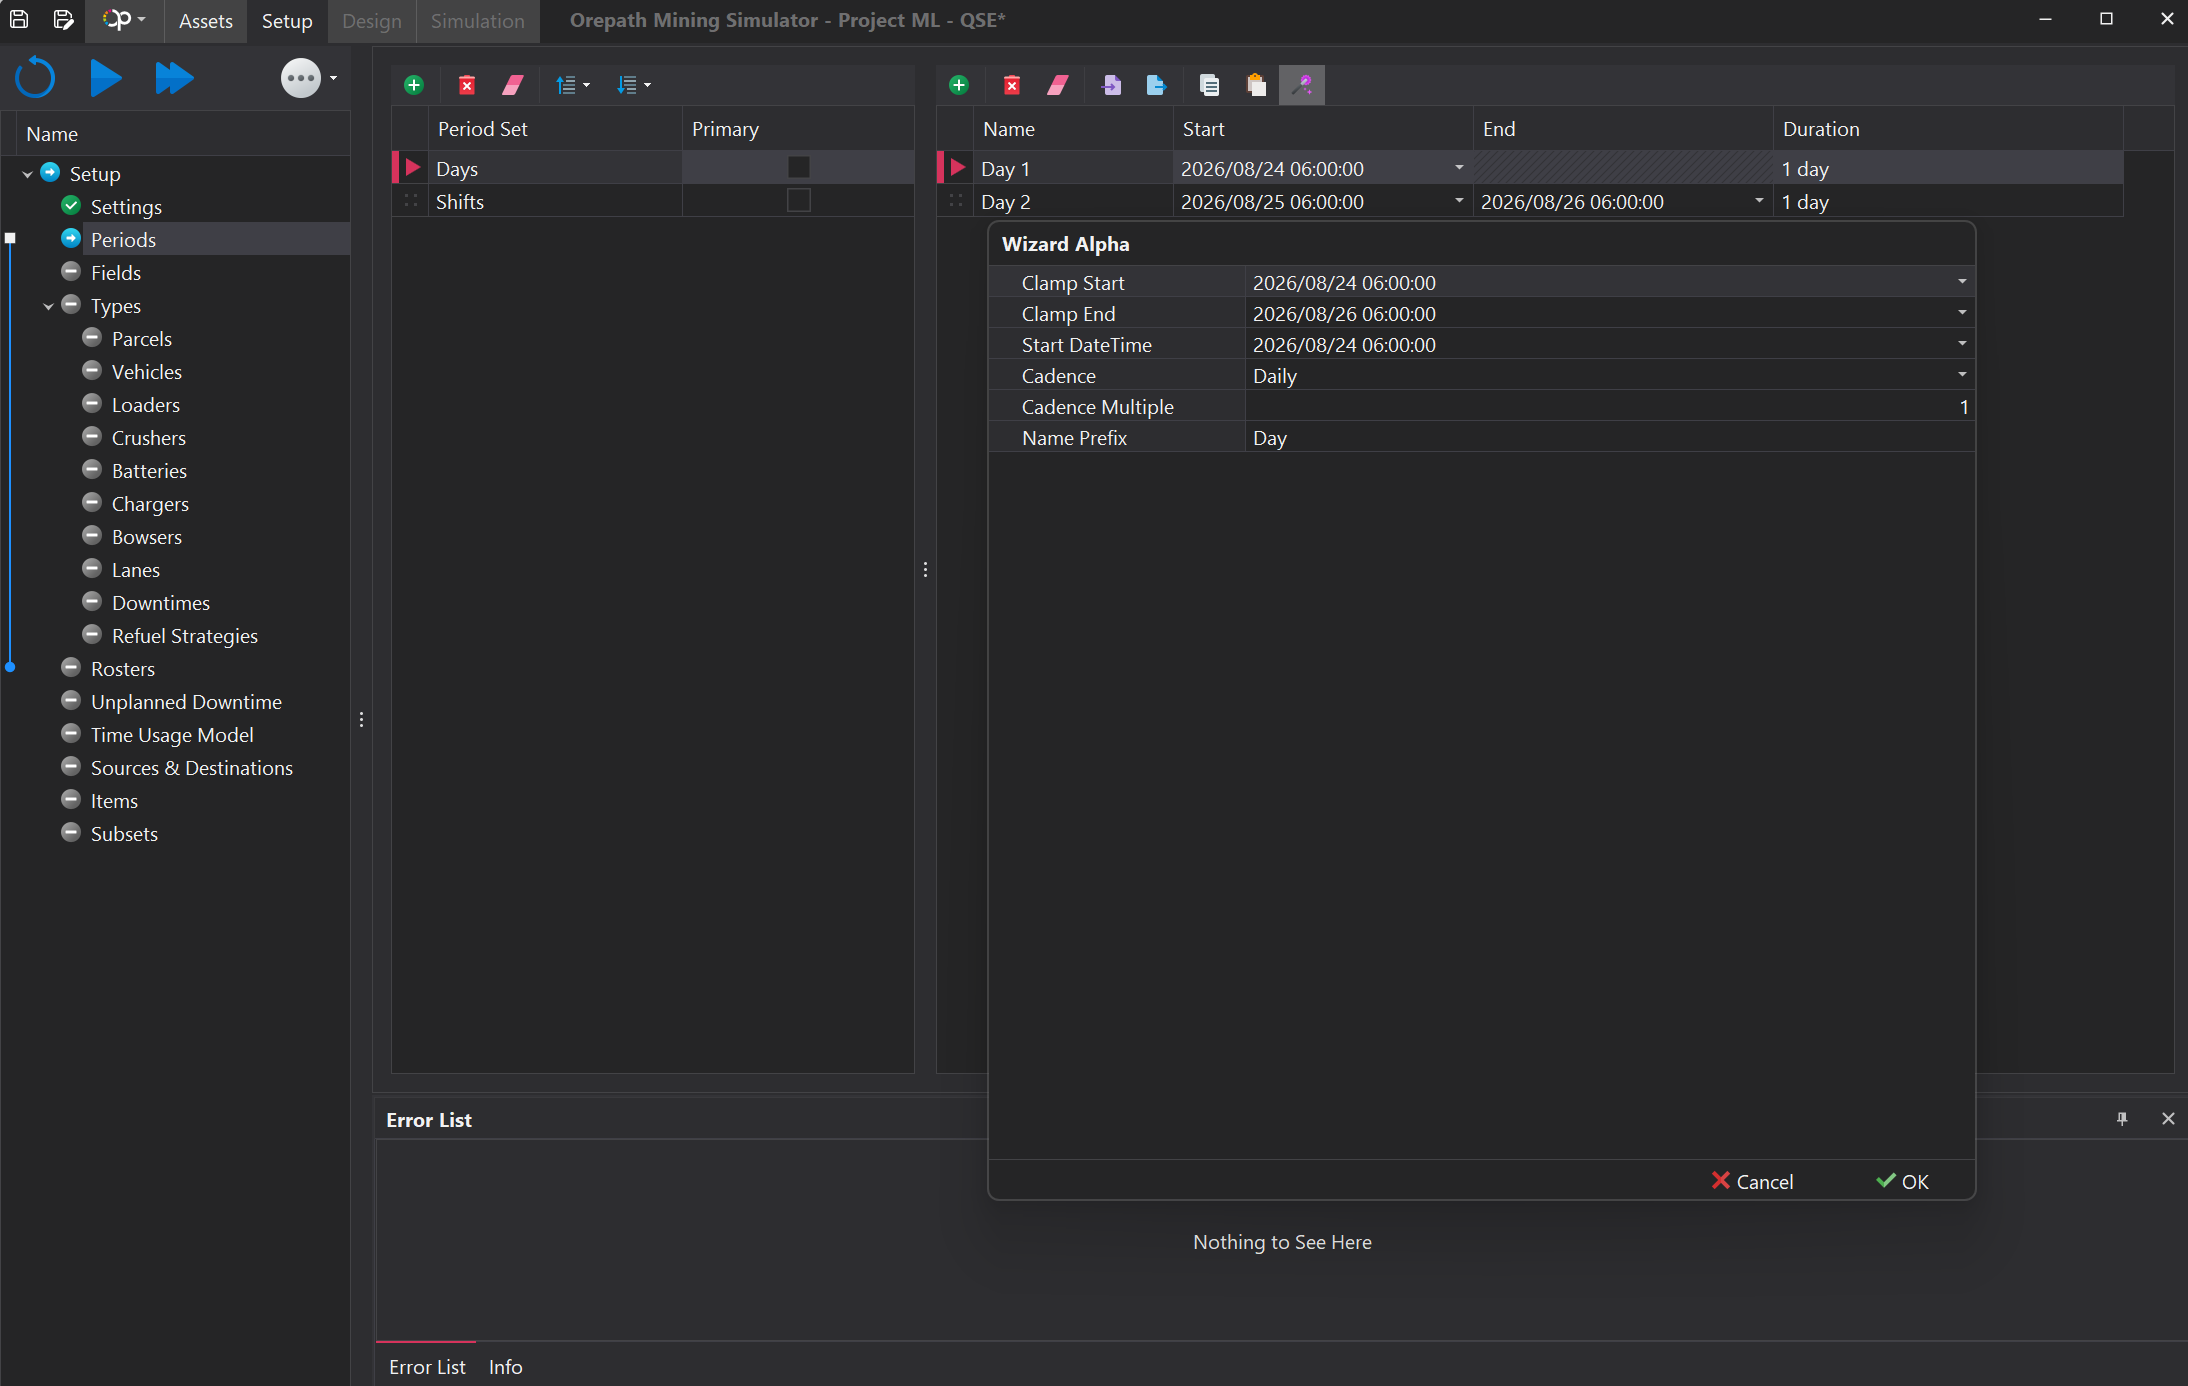
Click on Days Period Set. In the blank pane on the right, click on the Wizard icon.
Configure the wizard as per the image below and click on OK.
Shift Configuration
Click on Shifts Period Set. In the blank pane on the right, click on the Wizard icon.
Configure the wizard as per the image below and click on OK.
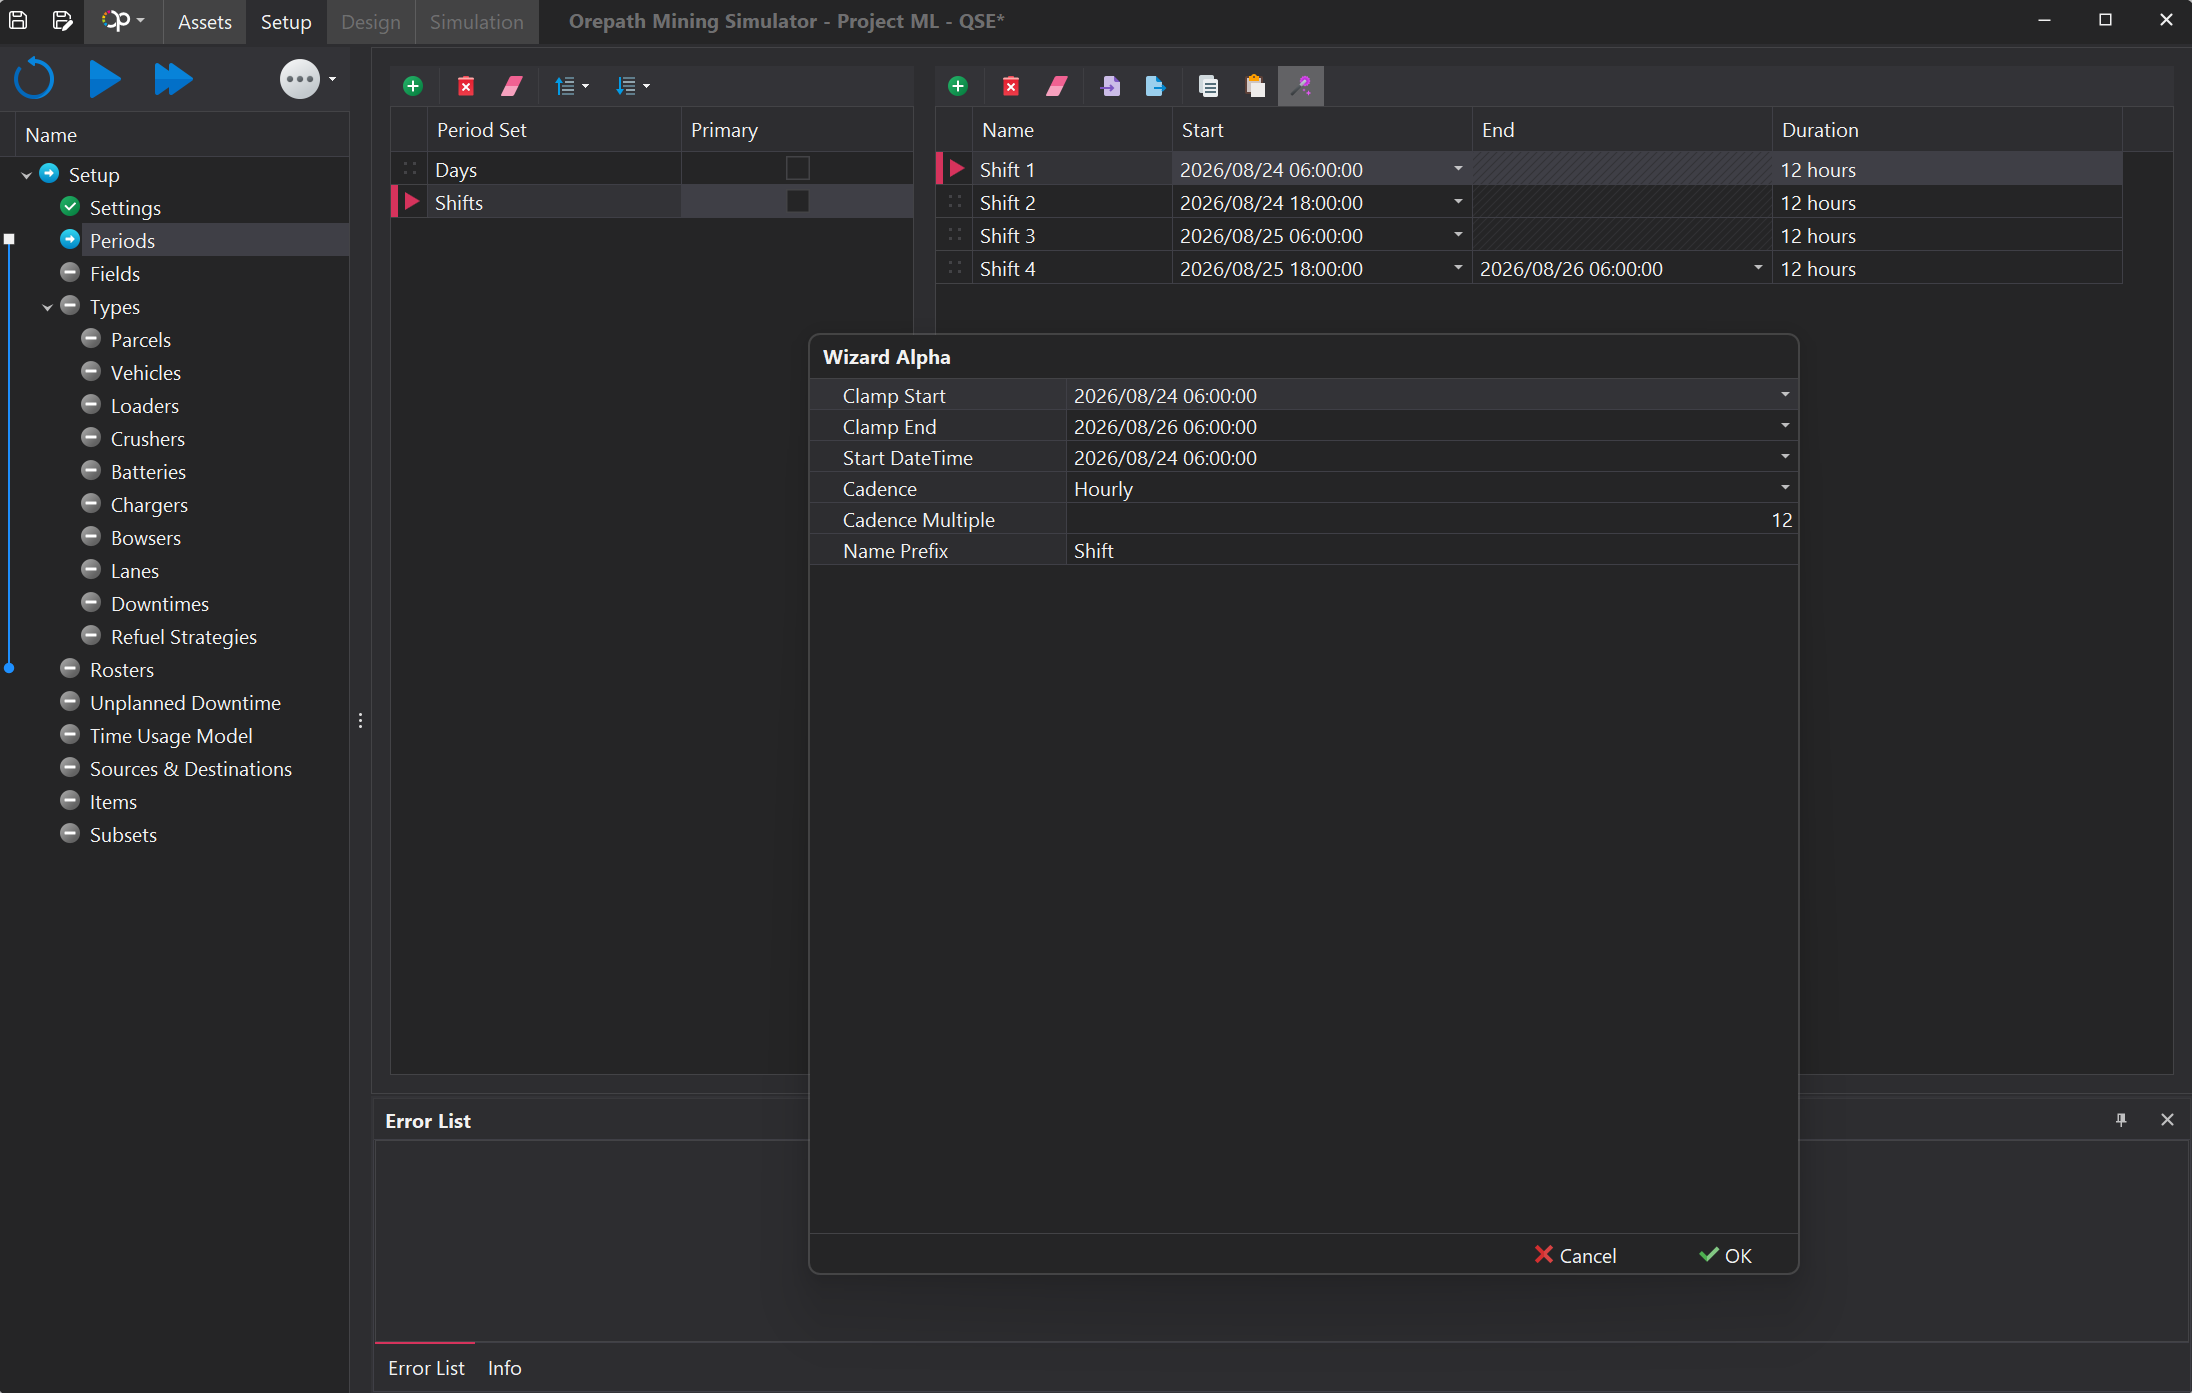
In the Wizard, ensure that your Clamp Start and Start DateTime values are aligned. Choose an end date that is an additional period (day or shift) beyond the duration that you want to simulate.
Fields
In the Fields setting, ensure that DryTonnes and WetTonnes are listed in the table. These settings should be configured by default.
Add a new field called Au and set it to be a weighted field. This will enable a dropdown box in the Weight Field column. Select DryTonnes as the weighted field and enter % in the Units column.
Type Definitions
Parcel
In the Parcels workstep, add 2 items and label them Ore and Waste. Assign a colour for each parcel type.
Vehicles
In the Vehicles workstep, click on the Import button, browse to the Project ML Setup Parameters folder and import the .optrucks file.
This will import the vehicles parameters for the T264 truck.
Loaders
In the Vehicles workstep, click on the Import button, browse to the Project ML Setup Parameters folder and import the .loaderTypes file.
This will import the vehicles parameters for the following loading units:
- Liebherr R9400 - 350-400t Class Excavator
- Liebherr R9600 - 600t Class Excavator
- CAT 994K - Large Wheel Loader for ROM Rehandle
For each loader unit imported, assign the T264 as the Loadable Truck.
Crushers
Add a new Crusher type called Jaw.
For the Jaw Crusher, set the Hopper Capacity to 2,000wt and assign a rate of 4,600wt/hr for the Ore and Waste parcels.
Bowsers
Add a new Bowser Type called FuelFarm and assign a flow rate of 40,000L/hr. Assign 180s duration for Setup and Tear Down Time.
Lanes
Project ML utilises 10m wide windrows, 30m wide Running Pavements for dual lane roads and 20m wide Running Pavements for single lane roads.
Add 2 Lane Types in the Lane Settings:
- Two Lanes with Turning Radius of 10m
- Single Lanes with Turning Radius of 5m
Configure the lane offsets as per below.
Be aware that Lane Offsets are from the centreline of a road.
For Example: If you have a 30m wide Running Pavement for a Dual Lane Road, you have 15m per lane. The Lane Offset should be half of distance of the lane, which is 7.5m. Also ensure that you digitise road centrelines in consideration of windrows.
Two Lane Configuration
Add 2 Lane Offset items and configure them as below:
- -7.5m offset with Forward Direction, the Fast Default Speed Limit and 2% Rolling Resistance.
- +7.5 offset with Backward Direction, the Fast Default Speed Limit and 2% Rolling Resistance.
Single Lane Configuration
Add 2 Lane Offset items and configure them as below:
- -7.5m offset with Forward Direction, the Fast Default Speed Limit and 2% Rolling Resistance.
- +7.5 offset with Backward Direction, the Fast Default Speed Limit and 2% Rolling Resistance.
Downtimes
In the Downtimes workstep, click on the Import button, browse to the Project ML Setup Parameters folder and import the .DowntimeTypes file.
This will import an initial list of downtime codes which are used for rostered personnel, trucks, loading units and crushers. At least 1 downtime code is required to proceed to the next workstep.
Refuel Strategies
In the Refuel Strategies workstep, click on the Import button, browse to the Project ML Setup Parameters folder and import the .refuelStrategy file.
This will import an a list of refueling strategies to allow the truck fleet to refuel instantaneously, at a bowser or dig face at specific thresholds.
Rosters
In the Rosters workstep, click on the Import button, browse to the Project ML Setup Parameters folder and import the .Rosters file.
This will import a 2 preconfigured rosters.
The Full Time roster contains no downtimes and is ideal for simple simulations.
The Standard Shift roster is configured with shift change and flyout delays which are feautred in the Downtimes configuration
Unplanned Downtime
In the Unplanned Downtimes workstep, click on the Import button, browse to the Project ML Setup Parameters folder and import the .UnplannedSet file.
This will import a configuration of downtime codes associated with trucks, loading units and the crusher; along with the associated durations and probabilities for each downtime.
Loading units are assigned downtimes for:
- Floor Clean Up
- Broken GET
- Broken Track
Trucks are assigned downtimes for:
- Punctured Tyres
- Bathroom Breaks
Crushers are assigned downtimes for:
- Oversize Blockage
In the Truck Set, increase the probability of the Tyre downtime to 10% and rebalance the Bathroom downtime accordingly.
Change the duration of the Tyre Puncture event to a min/max range of 8-11 hours.
Adjust the Bathroom Break so that it has a mean of 40 minutes.
Time Usage Model
In the Time Usage Model workstep, click on the Import button, browse to the Project ML Setup Parameters folder and import the .TimeUsage file.
This will import a 2 preconfigured elements for Time Usage Model reporting; Utilisation / Utilised Time and Operating Efficiency.
Sources & Destinations
In the Source & Destination workstep, load the Project ML - Mining Year 3 (MY3) wireframe from the Assets pane.
Click on the corresponding item in the Type pane and begin adding nodes for the source and destination types.
Add Stockpile Build Nodes
- In the viewport, navigate to the ROM Pad.
- Add 8 Nodes items in the left side pane.
- Assign names for each Stockpile Build Node and apply whatever naming scheme desired.
- Use the Select Location button in the top toolbar and align the Stockpile Build Node with the top of each ROM Finger.
Add Stockpile Reclaim Nodes
- In the viewport, navigate to the ROM Pad.
- Add 8 Nodes items in the left side pane.
- Assign names for each Stockpile Reclaim Node and ensure it has the same naming scheme as the Stockpile Build Nodes.
- Use the Select Location button in the top toolbar and align the Stockpile Build Node point with the bottom of each ROM Finger.
Add Dump Nodes
- In the viewport, navigate to the each waste dump.
- Add 4 Nodes items in the left side pane. There should be a dumping location for the following areas:
- Waste Dump 1 - West Floor
- Waste Dump 1 - East Floor
- Waste Dump 2 - 1320mRL
- Waste Dump 2 - 1340mRL
- Use the Select Location button in the top toolbar and align the Dump Nodes at the respective lifts and contours as per the provided map.
Add Dig Nodes
- In the viewport, navigate to each pit as required.
- Add 6 Nodes items in the left side pane.
- Pit 1 - 1270mRL
- Pit 1 - 1300mRL Contour (north-east of Pit 1 1270mRL)
- Pit 2 - 1240mRL - Ore
- Pit 2 - 1240mRL - Waste
- Pit 3 - 1280mRL Ore
- Pit 3 - 1280mRL Waste
- Use the Select Location button in the top toolbar and align the Stockpile Build point with the top of each ROM Finger.
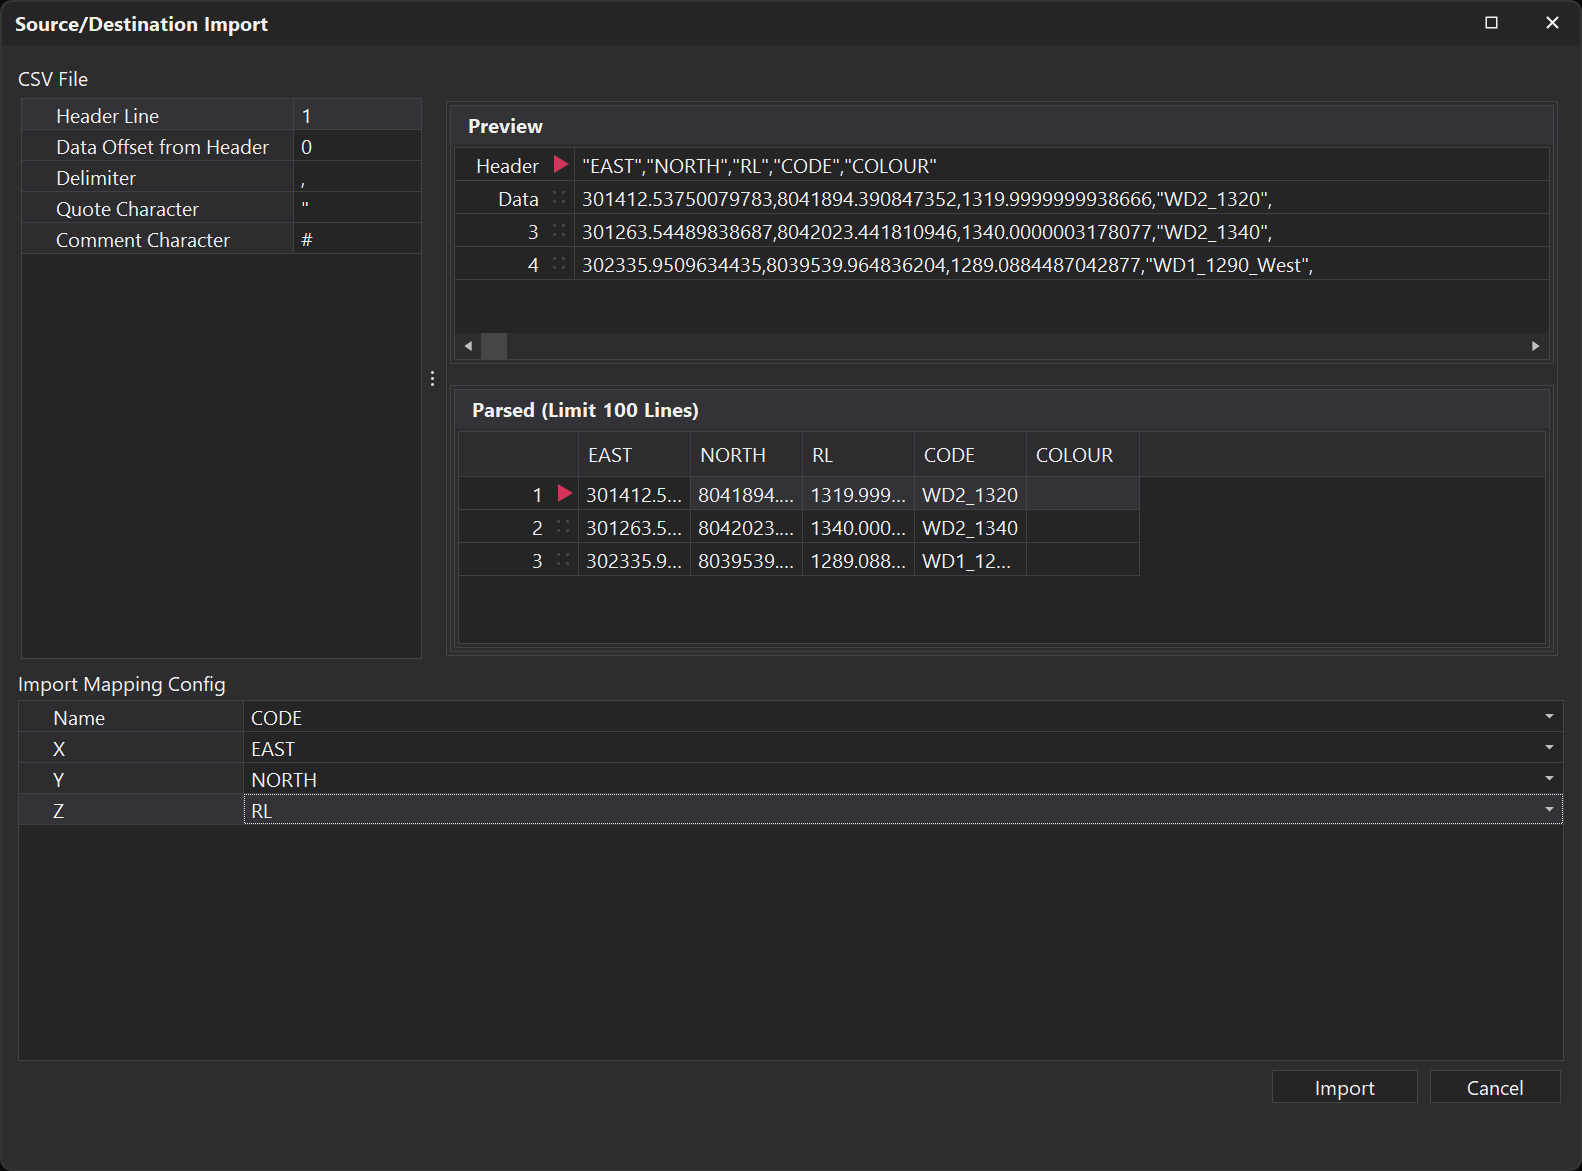
The CSV files provided can also be imported. Import the provided CSV files in the Project ML Setup Parameters folder and configure the importer as per the image below. Compare your assigned sources and destinations to the imported points.
Items
Use the Item Setup.xlsx as a guide to add the following items and units for the Mobile and Fixed Equipment:
- Add 30x T264 trucks
- Add 6 Loading Units.
- Assign 2 units as R9600.
- Assign 1 unit as R9400.
- Assign 3 unit as 994K.
- Add 1 Crusher and assign the Jaw type.
- Add 2 Go Lines.
- Add 2 Bowsers.
- Add 2 Workshops.
Remember, Fixed Items should be treated as a type of infrastructure. For example, Project ML only needs 1 type of Go Line for the T264. In the Design tab, multiple Go Lines can be added throughout the site.
Next Steps
Once all of the workflow steps in the Setup tab are complete, click on the Design tab in the top toolbar to begin designing the haulage network.